Gas station without pumps

2021 July 30

Secret Walks: Lower Riverwalk

Filed under: Uncategorized — gasstationwithoutpumps @ 21:06
Tags: , , , ,

On Tuesday this week, my wife and I took a short walk from Secret Walks & Staircases in Santa Cruz, by Debbie Bulger and Richard Stover. We’ve been doing one walk per section before repeating a section, and the only section we had not done yet was the Riverwalk, so we did the lower Riverwalk loop.  For once, we did not need to rotate the walk, but could start it at the official start.

dragon-gate-front

Quite recently, the pedestrian bridge over the San Lorenzo River was given decorative “gate” (which you can’t actually walk under) to commemorate what used to be a Chinatown in Santa Cruz. This is where the walk officially starts.

last_chinatown

The uprights of the gate have two bronze plaques—one gives a little history of the Chinatown.

chinatown_bridge

The other plaque explains the symbolism of the gate and its construction.

dragon_gate

This is the back side of the dragon gate.

low-water

The water in the river was about as low as I have seen it—we were probably at low tide, and there is not much fresh-water flow with the drought this year.

homeless-encampment

One reason my wife does not like walking on the Riverwalk is the enormous number of homeless encampments. The biggest one is on the benchlands below the the government center and does not really encroach on the walk, but there are smaller ones like this one.

under_the_bridge

The Soquel Avenue bridge is not very decorative from above (despite some nice mosaics by the local middle school), but the sculpting of the piers is rather nice.

del_mar_panorama

The backs of the buildings on Pacific Avenue are more attractive from across the river than they are up close.

house_on_the_hill

This house on East Cliff has a rather impressive retaining wall holding up the cliff.

boardwalk_panorama

The Santa Cruz Beach Boardwalk amusement park is somewhat attractive from across the river.

boardwalk_across_the_river

Here is another view of the Boardwalk, showing also the railway trestle that has a pedestrian path across the river.

egret

There were many egrets along the edges of the river, probably enjoying the wading at low tide. I took a lot of pictures, but mostly they birds were too far away for me to get good shots with only a 5× zoom.

One small error in the book (on p. 129) is that the authors put the intersection of Third and Leibrandt streets on the wrong side of the Riverside Avenue bridge. We were also unable to find the marker they mentioned showing the height of the 1955 flood, though there were a few places where plaques had obviously been removed.

chicakdee_mosaic

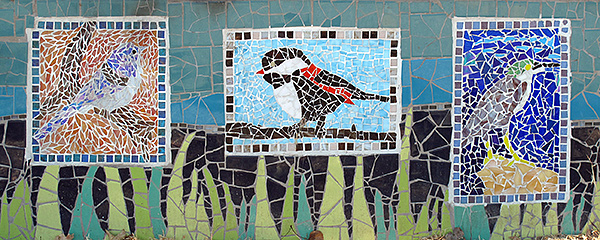
On the city side of the river, coming back to the dragon gate, there are a lot of mosaics of different birds. I believe that these mosaics (like the ones on the bridges) were done by the local middle school.

dragonfly_mosaic

There are also a number of mosaics of aquatic life.

My wife did not enjoy this walk as much as the others—mainly because of the homeless encampments. The loop itself is 1.6 miles, but we had a 1.5-mile walk to the start (detouring to deposit a check at an ATM) and a 1.6-mile walk home (detouring to get groceries and to pick up a New York Times as Bookshop Santa Cruz), so our total walk was 4.7 miles.

2021 July 26

3D-printed “quantum dot” revisited

Filed under: Uncategorized — gasstationwithoutpumps @ 14:55
Tags: , , , ,

In 3D-printed “quantum dot”, I wrote about my attempts to 3D-print the image from https://scitechdaily.com/direct-visualization-of-quantumdots-reveals-shape-of-quantum-wave-function-of-the-trapped-electrons/, especially how I was unable to get a good print using my Monoprice Delta Mini printer.

quantum3-gold

Here are two not-very-successful prints using silk-gold PLA filament. There was a lot of stringing and the peaks were too fragile and snapped off.

I decided to try again, but at a bigger scale: 70,000×, rather than 32000× in the xy dimensions, making a 10cm diameter pendant.  My first attempt, using a layer height of 0.14mm was OK for the peaks, but the hanging ring did not fare so well.  Part of the problem was that the ring was too thin, and part was that horizontal circular holes do not print well—the flat top at the inside of the circle is insufficiently supported.

Update 2021 July 28:  I was looking at the original data file today, and it looks like I dropped one of the zeros in the xy scaling (I now think the scaling is 700,000×, not 70,000×).  I need to check the z-axis scaling also.

hanging-ring-detail

The image on the right shows the collapsed circular ring on the version printed at 0.14mm layer height. The image on the left shows the redesigned hanging ring and printing at 0.1mm layer height.

quantum5

Here is the whole medallion at 0.1mm layer height in CC3D silk gold PLA with 20% infill. There was a little stringing and a few “zits” on the surface, but not too bad. I tried printing at 70micron layer height, but pronterface complained about not being able to allocate enough memory, so I gave up on that.

I’ll probably do one more post on these medallions, once I get the resin-printed ones that are printed without support.  The 10cm diameter is a bit too large for ordinary jewelry, but could work as stage jewelry.

2021 July 24

Secret Walks: Schwann Lake

Filed under: Uncategorized — gasstationwithoutpumps @ 17:09
Tags: , , ,

Yesterday, my wife and I took our longest walk so far in this series, which ironically happens to be the second shortest walk in Secret Walks & Staircases in Santa Cruz, by Debbie Bulger and Richard Stover. The part of the walk that is in the book is only 1.1 miles, but we had to get there and back, and Schwann Lake is on the opposite side of Santa Cruz.  We decided to take the #66 bus there, so we initially had a walk to the Metro Center (plus a little extra as we went back after a few block to pick up a forgotten face mask).

mosaic-stairs

On our walk down Laurel Street to the bus station, I took a picture of these fine mosaic stairs.

We also got off the bus a stop or two early, so we had about a 0.4 mile walk to the start of the Schwann Lake trail, which starts at the very back of the Simpkins Family Swim Center parking lot, so there were two miles walked before getting to the trail.

bare-tree

This bare tree made a very stark silhouette against the sky—the photo does not really do it justice.

cormorants

The book mentions that Schwann Lake is excellent for bird watching. We mainly saw cormorants—here is one view of a small portion of the total flock. I took several pictures of the cormorants from several places on the trail, but they were all at high zoom, so the individual birds are not very clear.

poison-oak-leaves

You need to stay on the trail, as off trail, the ground is covered in poison oak.

poison-oak-in-tree

The poison oak even grows up into the trees.

reaching-trees

The trees themselves are impressively menacing.

into-the-woods

Another section of trail overhung by twisty branches.

Afterwards we ate lunch at the Windmill Cafe and took a scenic route home, walking past Twin Lakes State Beach, around the yacht harbor, and along the cliffs overlooking Seabright State Beach.

lighthouse1

The lighthouse at the harbor, seen from Twin Lakes beach.

bronze-porpoise

A bronze porpoise in the yacht harbor—people like to touch its nose for luck.

lighthouse2

The lighthouse seen from the Murray Street bridge across the harbor—I had to zoom in a lot, as the distance is about 800m (½ mile).

lighthouse3

View of the Walton lighthouse from the cliffs over Seabright Beach. Note the concrete “caltrops” intended to keep the ground under the lighthouse from being washed away.

overhang

The walkway along the cliffs is fairly narrow now—in places you can see where the walkway used to be, before the cliffs collapsed.

crowded-beach

The overlook over the San Lorenzo River where East Cliff Drive bends gives a nice view of the main beach, which was far more crowded than Seabright Beach or Twin Lakes Beach.

We crossed the river on the pedestrian/bike bridge to Beach Street, which is now much wider and more pleasant than the old narrow bridge, and headed home through Neary Lagoon—about 5.6 miles.

judas-tree

We saw this shrub or tree in Neary Lagoon that we did not know. Using Google image search, I believe I’ve identified it as a Judas tree (Cercis siliquastrum). They are supposed to have quite pretty flowers in the spring—we’ll have to remember to visit the tree next spring.

Update 2021 July 25: Debbie Bulger thinks that this is a native Western Redbud (Cercis occidentalis). That seems quite likely, and I’m not sure how you tell the two species apart.

wood-duck-hen-2

We took pictures of this duck also, which we thought might be a female or juvenile wood duck. Again, Google image search confirmed that this is a wood duck hen

young-wood-duck

We had more trouble guessing what this duck was, but finally found a picture (from Encyclopedia Brittanica) which identifies it as a male wood duck before it gets all its glorious plumage. Because this duck was quite close the wood duck hen, we believe that they are related.

wood-duck-hen-1

Another photo of the wood duck hen.

With the walk to the bus, from the bus to the trail, and the scenic walk home, our total walking was about 8.7 miles.

2021 July 21

Crab-apple sourdough

Filed under: Uncategorized — gasstationwithoutpumps @ 18:17
Tags: , , , ,

I’ve been baking with sourdough since the rye bread rolls, 14 months ago.  But I’ve always felt like I’m cheating, since I started with commercial bread yeast and bacteria from yogurt and vinegar. Last Saturday (2021 July 17), I noticed while mowing the lawn that the crab apples were ripe and covered with wild yeast, so I thought that this would be a good time to start a new starter without any deliberate addition of commercial yeast or bacteria.

I chopped up

about 20 unwashed, ripe crab apples,

discarding the cores and seeds, but making sure to include the skins. I blended them in the blender, adding about

¼ cup warm water

so that the blender could process them.  The food processor would probably have been a better choice as it may not have needed as much water—not that it matters.  I then pushed as much of the pulp as I could through a fine strainer, ending up with about ½ cup of pinkish apple juice and water.  I added

½ cup warm water (to make up a cup)
2 Tablespoons sugar
1 cup bread flour

in a medium bowl and stirred to get rid of lumps. I left the bowl out on the counter, uncovered for a few days.  After one day (on Sunday), it looked there were a few small bubbles, and the pink color from the skin was all sitting on the top.  I stirred it down and left it uncovered.  On Monday there were more bubbles, and it looked like there might be some live yeast, and by Monday evening it began to look like a sponge.  I stirred in

2 cups bread flour
2 cups warm water

and let it rise overnight.  On Tuesday morning, it looked like a good sponge, so I stirred it down and removed one cup of mixture for new sourdough starter.

For the remaining, I mixed in

4 cups bread flour
2 Tablespoons sugar
2 Tablespoons safflower oil
1 Tablespoon of salt

with a bread hook.  I had not expected to need quite so much bread flour, so I was adding half a cup at time and kneading with the hook until it was all incorporated.  The dough was still a little sticky when I took it out of the mixer and kneaded in another

¼ cup bread flour

by hand.  I put it in a greased bowl, covered it with a cloth, and let rise for about 20 hours.  I then shaped the dough into two baguettes and left it to rise another 10 hours sitting on baking parchment. I preheated the oven to 400°F (probably only 350°F, as my oven thermostat seems to be off) and put a pan of boiling water on the shelf below the baking tiles.

I mixed

2 teaspoons cornstarch
4 teaspoons cold water

and brushed the tops of the loaves with the mixture.  I slashed the loaves and put them in the oven.  I rebrushed the loaves every 5 minutes for the first 15 minutes of baking time, then removed pan of water from the oven. At 25 minutes, I removed the baking parchment, leaving the loaves directly on the baking tiles.  Starting at 35 minutes, I checked the bread every 5 minutes to see if the bottom crust sounded hollow when tapped. The total baking time was about 45 minutes.

crabapple-sourdough

The bread came out looking good—perhaps the best-looking baguettes I’ve baked so far.

The recipe is entirely bread flour and a rather flavorless oil, so that I can get the taste of wild sourdough.  The crust was nicely crunchy, though I probably should put less cornstarch in the water that I basted the loaves with.  The crumb was good, but fairly dense—not the very open crumb that my wife prefers for a baguette.  The flavor was good: slightly sour, but without any off-flavors.  I think that this was very successful for a wild-yeast sourdough—it is a little slower rising, but seems to produce as good or better results than the sourdough that I made from commercial yeast.

3D-printed “quantum dot”

Filed under: Uncategorized — gasstationwithoutpumps @ 10:40
Tags: , , , ,

Earlier this year, I saw an article at https://scitechdaily.com/direct-visualization-of-quantumdots-reveals-shape-of-quantum-wave-function-of-the-trapped-electrons/ that included a very pretty picture of the scanning-tunnelling micrograph of the trapped electron.  I asked the author (Jairo Velasco Jr) for a copy of the data, so that I could 3D print it.  It took me a few attempts to get the scale and clipping right, but I was unable to get a good print using my Monoprice Delta Mini printer.

quantum3-gold

Here are two not-very-successful prints using silk-gold PLA filament. There was a lot of stringing and the peaks were too fragile and snapped off.

I finally got around to asking BELS to print one for me on their resin printer.  I had two choices of resin (clear or black), so I picked the opaque one.  The results are much better:

quantum3-black-top

Top view of the black resin-printed electron density.

quantum3-black

Somewhat more side view. I’ve played with the darkness here, to make the shape and layering more visible.

Unfortunately, they printed the part with supports, which rather spoiled the back, so I’ll probably order another one without supports.

quantum3-black-back

The back gives the scale: 32,000× in the horizontal direction and 2,000,000× in the vertical dimension. The ripples and dots are from the support structure, which was really not needed.

Correction 2021 July 28: The xy scale factor is incorrectly printed—it should be 320,000×, not 32,000×.  I had an error in my OpenSCAD code in copying the step size from the original data files.  The z-axis scaling is ok.

quantum3-supports

This is what the support structure looked like after I cut it away from the medallion.

The prints on the resin printer cost me an $11 setup fee, plus $3.64 for resin per print.  I think the tank is big enough to print 6 or 7 at a time, which would reduce the cost from $14.64 to about $5 each.  I’ll want to print a couple as gifts for the physicists who gave me the data. Each medallion is about 4.6 cm in diameter.

Next Page »