Gas station without pumps

2016 September 27

Teensy 3.5 & 3.6 Kickstarter

Filed under: Uncategorized — gasstationwithoutpumps @ 16:59
Tags: , , ,

As many of the followers of my blog know, the Teensy 3.1 and Teensy LC have been my favorite microcontroller boards for the past couple of years.  The Teensy 3.1 has since been replaced by the slightly better Teensy 3.2, which has a better voltage regulator but is otherwise pretty much the same as the 3.1.  I’ve been using the Teensy LC with PteroDAQ software for my electronics course.

I’ve just noticed that PJRC has a Kickstarter campaign for a new set of boards the Teensy 3.5 and 3.6.  These will be much more powerful ARM processors (120MHz and 180MHz Cortex M4 processors with floating-point units, so at least 2.5 times faster than the Teensy 3.2, more if floating-point is used much).  The form factor is similar to before, but the boards are longer, taking up 24 rows of a breadboard, instead of just 14.  The extra board space is mainly to provide more I/O, but there is also a MicroSD card slot.

The designer is still dedicated to making the Teensy boards run in the Arduino environment, and the breadboard-friendly layout is very good for experimenting.

PJRC is positioning the new boards between the old Teensy boards and the Linux-based boards like the Raspberry Pi boards. The new Teensy boards will have a lot of raw power, but not an operating system, though I suspect that people outside PJRC will try porting one of the small real-time operating systems to the board.

The new boards are a bit pricey compared to the Teensy LC ($23–28 instead of under $12 for the Teensy LC), but still reasonable for what they provide.  PJRC also has a history of providing good software for their boards.

I probably need to get both a Teensy 3.5 and a 3.6 to port PteroDAQ to them—that looks like a $50 purchase. If the boards and the software are available in time for me do development on PteroDAQ by December, I might get it done—any later than that and I’ll have no time, as I have a very heavy teaching and service load for Winter quarter.

I suspect that the new Teensyduino software will need a newer version of the Arduino development environment, which in turn would require a newer version of the Mac operating system (my laptop is still running 10.6.8), which in turn probably means a new laptop.

I’m waiting to see if Apple releases a new, usable MacBook Pro in October, so there is a bit of built-in delay in the whole process. I’m not impressed with their recent design choices for iPhones and MacBook Air—I need connections to my laptop—so there is a strong possibility that I may be having to leave the Macintosh family of products after having been a loyal user since 1984 (that’s 32 years now).

Update 2016 Sep 27: I just watched the Kickstarter video.  They used the Karplus-Strong algorithm as a demo.  Of course, that demo could have been done on a Z80 chip from 1976 (though not easily—the sampling rate suffered a bit to run 4 strings on the Z80, and only 8-bit DACs were affordable in those days).  It would have been more instructive to do an FM synthesis algorithm, which takes a lot more processor power than Karplus-Strong.
2015 August 16

Arduino-compatible software for FRDM-KL25Z board

Filed under: Circuits course — gasstationwithoutpumps @ 10:13
Tags: , , , ,

As many of you have realized, I’m finding that doing multiple-platform support for the PteroDAQ system is a bit annoying.  One irritation is that the mbed.org compiler for the FRDM-KL25Z board is not integrated with the other compilers—not even sharing the same file system.  So every time I make a change, I need to transfer all the files between my laptop and the mbed website—I can’t use mercurial or git to keep things in sync.

All the other boards I’m using can be compiled for locally and downloaded to with the Arduino IDE.  It is not a particularly powerful IDE, but it is dead simple to use, and it runs on my old Mac OS 10.6.8 (at least, if I use Arduino 1.0.6—the newer versions seem to assume new Macs).  A lot of the “professional” IDEs assume that you replace your computer every year and have the latest OS installed, or that you use nothing but Windows.

Since the FRDM KL25Z board is currently one of the best price/feature microcontroller boards on the market, I figured that someone must be working on an Arduino plug-in for the hobbyist market.  So I did some Google searches and found something that initially looked promising: Arduino-compatible software library for FRDM-KL25Z board – CodeProject.

FRDM-KL25Z is an interesting ultra low cost board with 32-bit microcontroller. What makes it interesting for the Do-It-Yourself community is low price (about $13) and also the compatibility with the Arduino pinout. If you are Arduino user like me, you will probably also feel interest if you hear about a board which could, for less than half the price of standard Arduino board, give you a 32-bit ARM MCU running at 48 MHz with 128 KB of FLASH and 16 KB of RAM memory, on-board accelerometer and more. But as you might have expected, there is a “catch”. The  FRDM board has the same layout of pins, so you can connect the Arduino shields to it, but there is no software compatibility. You cannot use the Arduino API functions such as digitalRead, delay, etc. and you cannot program the board from the Arduino IDE. I was thinking it would be nice if you could… And this article is my first step in this direction.

Digging deeper, though, disappointed me.  They are trying to provide the trivial parts of the Arduino API, but they do their compiling with Kinetis Design Studio (which doesn’t run on Mac OS 10.6.8, and which is supposedly a bit of a bear to learn to use).  I’m more interested in the opposite combination—using the Arduino IDE, with only minimal use of the Arduino API (which I find a bit too inefficient for my tastes), except for a couple of difficult things (like the USB stack).

They’ve also licensed their code with a contagious LGPL license, which is too restrictive for the PteroDAQ code.

What I’m looking for is something like the Teensyduino implementation, but for the FRDM KL25Z board. I’ll have to look at how the Teensy loader is integrated into the Arduino IDE—if I can figure out how to put in copying a .bin or .s19 file to an emulated flash drive instead, then I can probably program for the KL26Z board, and possibly for the KL25Z board.

2015 August 10

PteroDAQ boards

Filed under: Circuits course,Data acquisition — gasstationwithoutpumps @ 17:50
Tags: , , , , ,

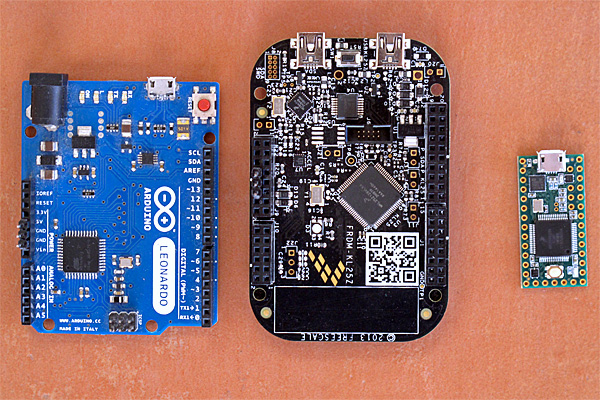
I took a photograph this afternoon of three of the boards that can be used with the PteroDAQ data acquisition system:

On the left is the Arduino Leonardo, the slowest and most expensive of the boards here.  In the middle is the KL25Z, which I've been using in my class for a couple of years—it is the cheapest and most featureful of the boards.  On the right is the Teensy 3.1 (without headers yet), which is  the fastest and smallest of the supported boards.

On the left is the Arduino Leonardo, the slowest and most expensive of the boards here. In the middle is the KL25Z, which I’ve been using in my class for a couple of years—it is the cheapest and most featureful of the boards. On the right is the Teensy 3.1 (without headers yet), which is the fastest and smallest of the supported boards.

I’m considering switching to the Teensy 3.1 for the class, despite its higher price than the KL25Z board, because adding male headers to the bottom of the board makes it possible to plug the Teensy 3.1 into a bread board, which makes for more secure wiring than running separate wires to the KL25Z board.  We don’t really need the 64 pins of the KL25Z board, we’re not mounting Arduino shields, and we’re not using the accelerometer or the touch sensor, so the main question is whether it is better to have the data-acquisition board be standalone or be inserted into a bread board. The RGB light on the KL25Z board is a nice feature for providing feedback that is missing from the other boards (which only have a single-color LED).

I’ve also thought about usefulness to the students after the course, though few of the students will go on to do anything other than PteroDAQ with the boards.  The Arduino IDE is much easier to deal with for beginners than any of the development environments for the KL25Z, and Teensyduino is pretty easy to install on top of the Arduino environment.  So if students are going to go on to do hobbyist-level programming on the boards, then an Arduino board or the Teensy 3.1 might be a better choice. Given how much more powerful the Teensy 3.1 is than the old ATMega-based Arduinos, I see no reason to recommend buying Arduino boards (though clones from China have gotten down to about $3).

Erich Styger, in a comment, mentioned that he is frustrated by the Teensy’s lack of a SWD (serial wire debug) connector, which he is used to using for debugging. Since I’m from an older generation of programmers, I don’t miss it—I’ve not used the SWD connector on the KL25Z boards (though my son has, to use the OpenSDA chip as a programmer).  For me, it is a luxury to have a serial port for getting print messages from the board—I started microprocessor programming in the days when having one or two LEDs was about all the information you got back from the board. Having debuggers like GDB was a luxury available on computers that cost thousands of dollars.

Of course, the ARM processors on the Teensy 3.1 and the FRDM KL25Z boards are very much more complicated than the old 8080A, Z80, and 6800 8-bit processors I started with, and people are writing much larger programs for them, so I can see the advantage of having a debugger. But there is a large startup cost to learning to use a debugger and setting up the complicated software development tools they expect you to use, so I’m happy recommending the very limited, but easy-to-use Arduino interface for bioengineering students who want to go a bit further.

I’m curious what my readers think about the choice between a FRDM KL25Z board and a Teensy 3.1 board for the Applied Electronics class, given that most of the students will only use the boards for that class.  What tradeoffs might I have missed?  If you were in the class, which board would you rather work with?

PteroDAQ supports Teensy 3.1

Filed under: Circuits course,Data acquisition — gasstationwithoutpumps @ 00:25
Tags: , , , ,

In one day my son and I added support for the Teensy 3.1 board to the PteroDAQ data acquisition system that previously supported the Freedom KL25Z board and the ATMega-based Arduino boards.

We ended up using the Teensyduino development system, but really only for the downloading and for the usb-serial library, since the K20 ARM chip on the Teensy 3.1 is quite similar to the KL25 that we originally based things on.

The Teensy 3.1 is a lot easier to install the software on than the Freedom boards, and runs a little faster (72MHz instead of 48MHz), but has essentially the same ADC.  Actually, it has 2 analog-to-digital converters, but most of the pins can only be read by ADC0, so we’ve not set up ADC1 to read anything but the internal 1.2V Vref (which is conveniently provided as an output on the AREF pin).  We had originally planned to use just ADC0, but the code for reading the Vref signal on ADC0 never worked—I suspect an error in the reference manual, since changing to reading Vref with ADC1 worked fine.

The Freedom boards are cheaper, are easier to unplug the USB cables from, can deliver more power at 3.3V, have RGB LED, and have a lot of neat features missing from the Teensy boards, but the Teensy boards can be configured to plug directly into a bread board (if you give up a lot of the connections and just use 26 pins), and have more RAM (so can run for longer at high sampling rates before the buffer overflows).

I’m going to have to rewrite part of my book to talk about the possibility of using the Teensy 3.1, and I’ll have to decide whether the extra $6–$7 is worth the simpler setup for my Applied Electronics lab course. We’d sacrifice being able to get much power from the board (probably only about 100mA instead of 500mA at 3.3V), but that is a relatively minor loss, since we have bench power supplies at every station.

I’m not sure what I’ll recommend in the book for people trying to learn on their own—I’ll probably have to play with the Teensy a bit to see how useful it is.  I have at least one other program that the students have been using in the lab (the frequency detector for turning a relaxation oscillator into a touch sensor) that I’ll have to port to Arduinos and the Teensy 3.1.

For home hobbyists who aren’t planning to dive deep into embedded-system programming, the Teensyduino IDE is a lot friendlier than the MBED.ORG tools (and I hear that the Kinetis SDK has a very, very large learning curve), so it might be a better board despite the lack of peripherals (no accelerometer, RGB LED, or capacitive touch slider).


2015 July 30

New dimmer software

Filed under: Uncategorized — gasstationwithoutpumps @ 15:46
Tags: , , , , ,

Based on the success of the stroboscope software, I rewrote the dimmer software for my desk lamp (see LED lamp projects for more about the lamps).  The new software provides smoother control of the light levels (having 256 levels plus off, rather than 63 levels plus off) and now has a 256:1 brightness range rather than the approximately 256:6 range of the previous code.

I removed a lot of the general-purpose crap that was inherited from core13 (which was in turn stripped down from the Arduino core software).  I did not get rid of all of core13, so I could probably take out another 50–100 bytes, but the code is down to 222 bytes (and the ATtiny13A has 1kB of flash, so I’m way below the limit).

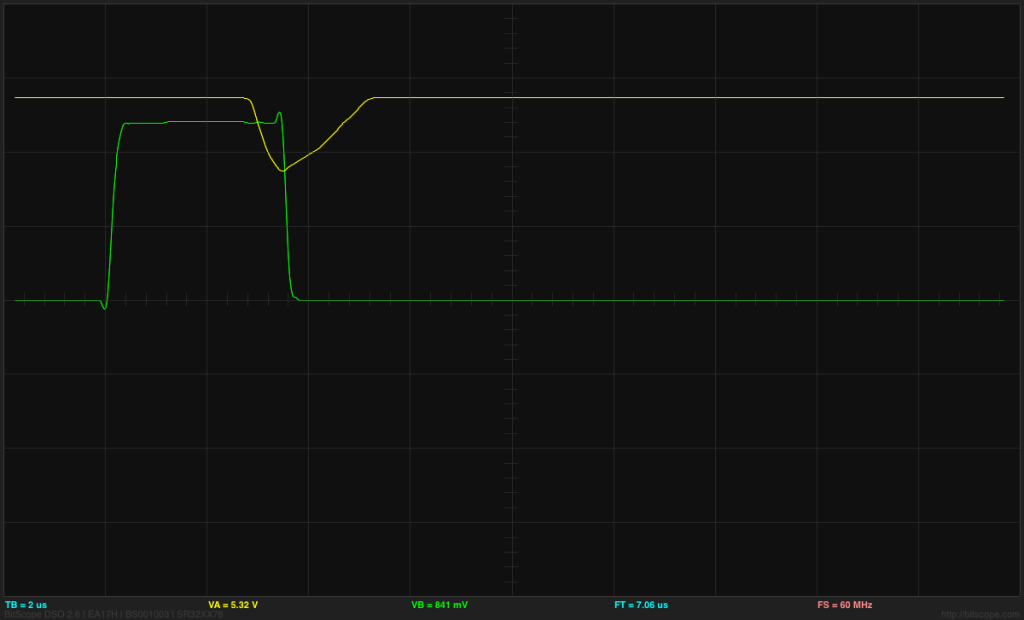
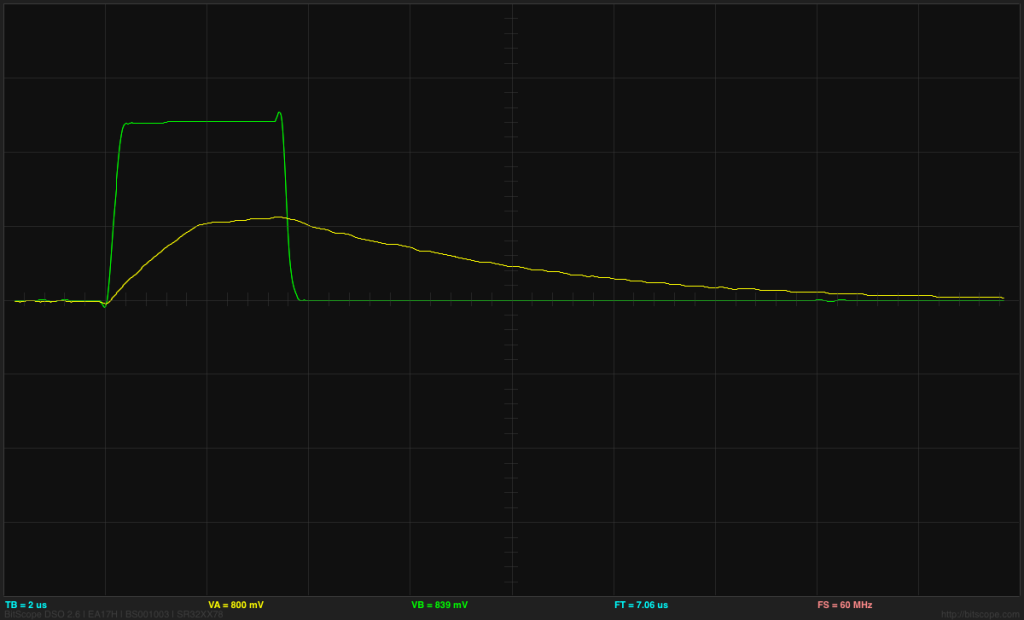
The actual brightness range of the new dimmer is a bit more than 256:1, because on the shortest pulse the FET doesn’t turn all the way on.  The pulse duration from the ATtiny13A is approximately 3.4µs times the brightness level (9.6MHz clock divided down by 4 and by 8), but I had deliberately slowed the FET transitions by adding a series resistor to the gate, so that nFET doesn’t finish turning on for 5.2µs (as judged by the end of the Miller plateau on the gate).  So at the lowest brightness level, the nFET does not turn all the way on and the voltage on the drain only gets down to 3.5V, which leaves 5.5V across the LED board—enough to turn on the LED, but with only about 10mA, not 118mA. At this low level, the LEDs sometimes flicker, perhaps as a result of some thermal feedback effects. The all flicker together, so the effect is probably in the dimmer’s nFET, not on the LED boards.

ATtiny output (green) and gate voltage (yellow) at 2V/division and 2µs/division for the shortest pulse length.   The gate voltage has not quite reached the end of the Miller plateau before being discharged again.

ATtiny output (green) and gate voltage (yellow) at 2V/division and 2µs/division for the shortest pulse length. The gate voltage has not quite reached the end of the Miller plateau before being discharged again.

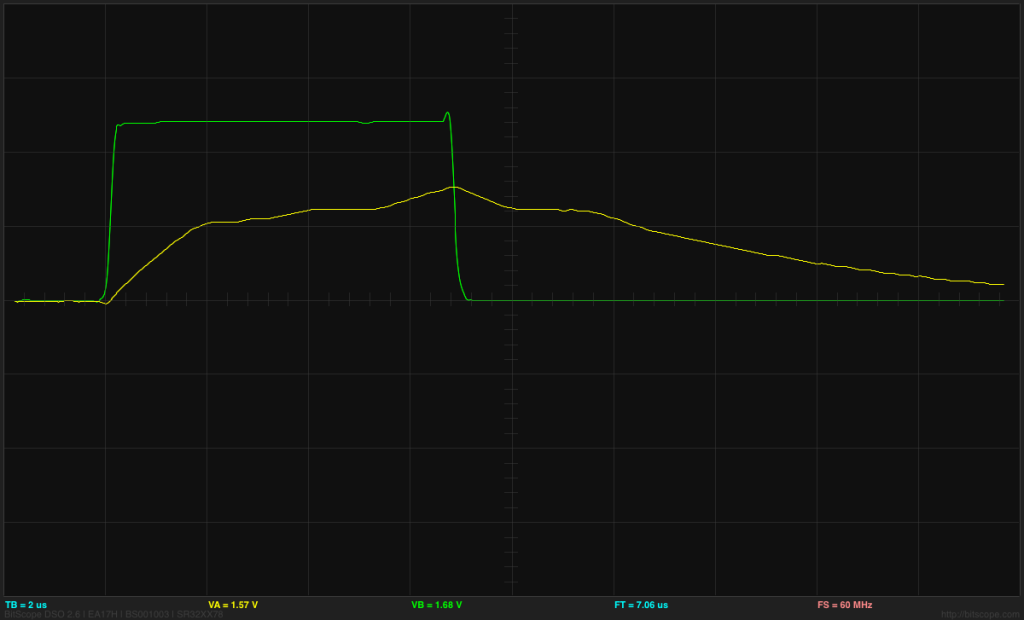
ATtiny output (green) and drain voltage (yellow) at 2V/division and 2µs/division for the shortest pulse length.  The BitScope BS-10 oscilloscope clips the voltage to 5.5V—it actually goes to 9V.

ATtiny output (green) and drain voltage (yellow) at 2V/division and 2µs/division for the shortest pulse length. The BitScope BS-10 oscilloscope clips the voltage to 5.5V—it actually goes to 9V.

At the next brightness level, the drain voltage does drop to 0V for at least 2.4µs and stays low enough for the LED board to be at maximum current (below 2.5V) for at least 5.5µs.  There is an enormous difference in brightness between length 2 and length 1 pulses (more like 1:20 than 1:2), because of the low current for pulse length 1, but for length 2 and longer the steps in brightness are pretty much as one would expect from the pulse lengths.

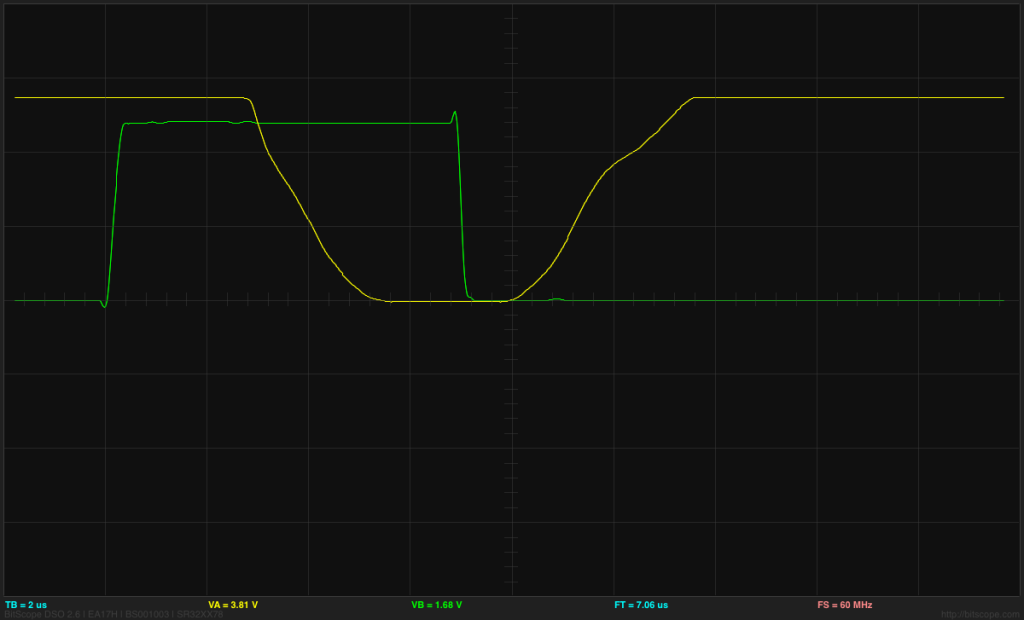
ATtiny output (green) and gate voltage (yellow) at 2V/division and 2µs/division for the shortest pulse length.   The gate voltage has gone past the end of the Miller plateau and started charging past that point. The Miller plateau is also visible on the discharge as the nFET turns off.

ATtiny output (green) and gate voltage (yellow) at 2V/division and 2µs/division for the shortest pulse length. The gate voltage has gone past the end of the Miller plateau and started charging past that point. The Miller plateau is also visible on the discharge as the nFET turns off.

ATtiny output (green) and drain voltage (yellow) at 2V/division and 2µs/division for the  second shortest pulse length.  The BitScope BS-10 oscilloscope clips the voltage to 5.5V—it actually goes to 9V.  The longer pulses allow the nFET to turn on fully.

ATtiny output (green) and drain voltage (yellow) at 2V/division and 2µs/division for the second shortest pulse length. The BitScope BS-10 oscilloscope clips the voltage to 5.5V—it actually goes to 9V.
The longer pulses allow the nFET to turn on fully.

The conversion from the linear 10-bit analog-to-digital reading (0–1023) to pulse lengths is done by the following method:

expon = ADC>>7
frac = 0x80 + (ADC & 0x7f)
pulse_len = ADC < 0x20? 0:  ADC < 0x40? 1: 1+ (frac>> (7-expon))

The stepwise nature of the brightness at low levels is apparent in a plot of the conversion function:

The steps in brightness are quite visible at the low end, but after the first 10 steps, the differences are small enough not to be easily noticed.

The steps in brightness are quite visible at the low end, but after the first 10 steps, the differences are small enough not to be easily noticed.

Overall, I’m pleased with the rework of the dimmer code. I’ll probably have to solder up another of the dimmer boards this summer, since I’ll want one for the light fixture that I haven’t started building yet and one for the Halloween stroboscope.

Next Page »