On Tuesday, 2013 July 16, I ordered Freescale’s new $13 KL25Z development board from Digi-Key as part number FRDM-KL25Z-ND, they shipped it within an hour and a half, and I got it on Thursday, 2013 July 18 (shipping charges were $3.43, but I had ordered a few other parts at the same time).
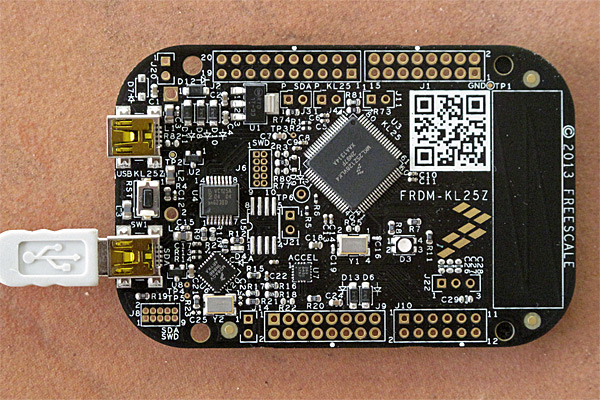
My KL25z board with a USB cable plugged into the SDA USB port. This is the port used for downloading. The other USB port is used for serial communication, mouse or keyboard emulation, and so forth.
The board does not come with any headers, so I’ll need to buy a 2×6, 2 2×8, and a 2×10 female header to solder in. These will add about $3.36 $5 to the cost of the board—more since I neglected to order them with the board and so will have to pay shipping again. The headers would cost $2.05 $3.07 in hundreds, which would be the right quantity to buy if we used the boards in a lab course. (I had the wrong female headers selected before—the 2×3, 2×4, and 2×5.) Adding headers would have added about $2.50 $4.50 to the cost of making the board (either adding a wave-soldering step or using more expensive surface-mount headers), so you can see why they left the connectors off in a $13 board. Besides, for many applications, engineers would prefer to solder wires to the board, rather than using headers.
The lack of headers is a bit of a problem for using the boards as data acquisition devices in the Applied Circuits course, as the students have to be able to data acquisition in the first week, but we don’t get to soldering until later in the course. I could make the KL25Z boards be an option, for those who already know how to solder.
The technique for downloading to the board is elegant: if you plug a USB cable into the SDA USB port on the board, the board looks like a flash drive to the computer. Dragging a binary file to that drive causes the file to be loaded into the flash memory of the MKL25Z128VKL4 processor on the board.
Unfortunately, one thing that Freescale doesn’t tell you about the board is that they ship it with a bootloader and flash-drive downloader written by PE Micro, and this firmware only works with Windows computers, not with Linux or Mac computers. PE Micro claims that version 1.12 of their firmware fixes this terrible bug, but that doesn’t do much good if (like me) you are shipped a board with version 1.09 of the bootloader.
Luckily there is a workaround, explained by MBED: do a bootloader download of the MBED flash-drive downloader using a Windows machine. Thereafter you can do the drag-and-drop downloads of programs as intended, even from Linux and Mac computers. The explanation by MBED is not completely clear, as it implies that you only have to do this if the BOOTLOADER does not appear as a flash drive on the Mac, but it seems to be necessary even with the BOOTLOADER visible. Presumably, loading v 1.12 of the PE micro software would work also, but I haven’t tested that (and any company that releases 11 non-functional versions before testing on a Mac or Linux machine has lost all my confidence in their software development ability). I took the board into work yesterday and downloaded the MBED firmware using a Windows machine, and I now have no problem dragging and dropping software using my Mac.
The MBED system is an interesting tool chain for developing C/C++ software for ARM processors. They provide an open-source software development kit (SDK) and a free online compiler and integrated development environment,which includes an online compiler, a version control system, easy import of libraries and example code, and easy public release of code to other users of the system.
The reason for this online compilation is probably that the ARM RVDS 4.1 compiler they use is terribly expensive—ARM does not give a price, but uses the “get a quote” system, which almost always means that prices are astronomical. If you have to ask, you can’t afford it. Freescale also sells a development system called CodeWarrior, at various prices, including a free version. But the free versions, at least, are only available as exe files for Windows, and so useless to me.
It should be possible to use the gnu gcc compiler for the ARM processors, but I’ve not investigated how to set it up for the KL25Z board. My son is looking into this, as he does not like online compilers and idiosyncratic IDEs, preferring to use familiar editors, command lines, and Makefiles for his compilation (as I do). If he gets the gnu compiler set up for the board we can export any libraries and programs from the online compiler to our own machine and use the gcc compiler. We can also compare code size between the ARM compiler and the gcc compiler. I suspect that the ARM compiler, whose code generator can be tailored more closely to the ARM architecture, produces smaller, faster code, but that is unlikely to matter in any of our applications.
One problem I see with the free toolchains for the KL25Z board, compared to the Arduino IDE, is that there is no equivalent of the Arduino serial monitor, so debugging a downloaded program may be difficult. If we don’t find a serial monitor already written, my son or I may write one in Python (based on the serial communication stuff he wrote for the Arduino Data Logger). The MBED site provides easy sharing of ARM code, but nothing for sharing code that lives on the host at the other end of a USB cable.
The MBED SDK provides an Application Programming Interface (API) that is at about the same level of abstraction as the Arduino API, so programming should be fairly easy. I plan to do a little playing with the board this weekend, just using the on-board peripherals (capacitive touch-sensor slider, 3-axis accelerometer, 3-color LED, and USB port). I can’t really do any work this weekend anyway, because campus had a power failure Friday night and the file servers I use won’t be rebooted until Monday.
[Update: 2:30 pm: I’m not going to be doing any development work on the KL25Z this weekend after all. I had the device mounted as BOOTLOADER (to check the version number of the bootloader for this post), and accidentally dragged a file to it, downloading a file that overwrote the MBED program and rendering the device once again invisible to Macs (except for the destroy-only BOOTLOADER). I’m going to have to wait until Monday to go back to work and reload the MBED program using a Windows box.
Until Freescale starts shipping the boards with a properly functioning bootloader, I’m afraid I can’t really recommend the boards. Having to find a Windows machine every time I make a careless error like this is just too big an irritant.]


")
 or hardback ($198)")

